
Trading With The "Bull Flag" Pattern
My go to pattern for day trades and consistently easy money. "Flagging on the 5"

By far and away the Bull Flag is my favorite play. The strategy is simple, its easy to spot, its easy to execute, and the best part? It’s consistent. The bull flag consists of a spike in price, followed by consolidation in a tight range in the shape of a flag to the right as time moves, then a breakout. That’s it.
Lets take a look. I’ll break it down in simple steps. (I mainly use the 5min intraday chart for these. I find that the 5 is the most consistent.)
Step 1: The spike.
Look for any large spike in price. If you don’t have a scanner, create a watchlist through your broker of the “biggest gainers.” This should be an available preset. The majority of the big gainers during the day have bull flags all through them that you can trade.

Step 2: Consolidation and entry
Once you find a spike, watch it. One of the key rules for trading is “don’t rush it”.
If you miss an opportunity, it’s ok. There will always be another. ALWAYS.
Once you see consolidation in a consistent zone after a spike, you can make an entry. This stock bounced from $2.85 to $2.75 repeatedly. See below. The green line represents your target entry point and the red line would be your stop.
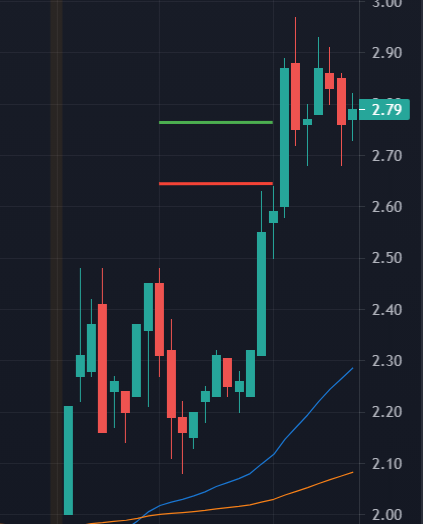
Your entry should be as close to the base of the flag as it can (Averaging down is an easy way to get it as low as possible. Bought half at $2.84? buy another half at $2.70. New average of $2.77.)
Your stop should be down the “pole” a little further to give it room to breath but also protect you incase the pattern fails. If you set your stop too close to the base of the flag, you may sell out too early. ( See the dips to the $2.60s?) That’d be no fun if the stock spikes.
Step 3: The breakout.
Once the stock breaks the top of the flag, it will typically spike 1.5x-2x higher than the original spike. The breakout is represented by the cross through the consolidation zone. (yellow line). Look at how this one ran from our entry point.

Taking profits is the next step. There’s typically two mindsets with this. You can either have a set goal in mind (% or $ amount), or move your stops along the way, and wait until it triggers. Its never going to be the exact top, so don’t stress over it. In this instance, I moved stops to the next flagging zone. Its typically safe to move your stop to the previous breakout point (yellow line), or the base of the next consolidation zone. Continue that trend until you get stopped out. See below.

This particular trade made close to 40% in a matter of an hour or so. The beauty of this, is that its repeatable, it’s easy, and it happens often. Worst case scenario you would’ve been stopped out for a 5% loss. If you ever see me say “$XYZ Flagging on the 5,” this is what I’m talking about. Put it into practice with a paper account or small batch trading. Practice makes perfect.